
MODULE 2 - SCOUTING FOR ELK
CHAPTER 2: SCOUTING WITH GOOGLE EARTH

In my opinion, Google Earth is the most powerful online Scouting resource available to elk hunters. Using Google Earth, I am able to see everything I am looking for from an aerial, 3D perspective, not unlike hopping in a plane and flying over the area. It provides a birds-eye view of satellite imagery, maps, and terrain, all available without ever leaving the comforts of your home. From this “remote” perspective, I can identify water sources, feed sources, bedding areas – even down to details such as game trails, access roads, photos of the area, and much more. Areas that are likely to hold elk can be identified through this virtual “E-scouting” tool, which allows hunters to maximize their limited resources and focus actual “on-the-ground” scouting in those areas that hold the most potential.
If you don’t have Google Earth, you can download it for free. And there are multiple versions to download, depending on what platform you want to access it from. Google Earth PRO is available to download to your desktop computer, and you can also download the Google Earth app to your mobile device. Simply click on the link below to start your free download:
https://www.google.com/earth/versions/
GETTING THE MOST OUT OF GOOGLE EARTH
Google Earth is packed full of many powerful tools, but there are a few that specifically come in handy for E-scouting. There are four navigational controls found in the top right hand corner of the page that allow you to zoom, pan, tilt, and move around the area you are scouting.
“NORTH-UP”
The top controller is the “North-Up” button. By clicking on the “N” on the outer ring, you can spin the view around the center point of the viewing area. You can also simply click on the “N” to immediately bring your perspective back to “North-Up” at any time.
“LOOK”
On the inside of the “North-Up” button, you’ll find the “Look” joystick – an eyeball surrounded by four arrows that allow you to pan side-to-side (left and right arrows) as well as tilt the view (top and bottom arrows). When you first start Google Earth, the default view is a “top-down” view, which is looking straight down on the topography. By clicking on the top arrow of the “Look” joystick, you can gain a 3D perspective of the area and bring elevation features such as mountains and ridgelines to life.
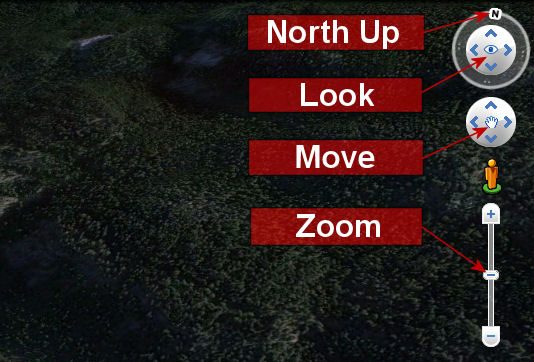
Once you have tilted the view so you are looking at a particular object, such as a hill, you can also rotate around that object by using the left and right arrows of the “Look” joystick. When you do this, the object remains in the center of the view, but you are able to look at it from different perspectives (i.e., north, south, east, west) as you rotate around it.
“MOVE”
The next controller located below the “North-Up” button is the “Move” joystick. It has a “hand” in the center of the button that is also surrounded by four arrows. You can use the “Move” joystick to pan your position from one place to another. Clicking on an arrow on the “Move” joystick will provide a “fly-by” in the direction you are scanning. With the tilt turned on (top arrow in the “Look” joystick) and an eye altitude (view) of 20,000 feet, this gives you a perspective similar to flying over the area in an airplane. As you identify possible areas worthy of a closer look, you can use the “Zoom” slider to zoom in or out.
“ZOOM”
The “Zoom” slider is the bottom navigation controller, and as you move closer to the ground, Google Earth automatically tilts to change your viewing angle to be parallel to the Earth’s surface. (You can turn off the automatic tilt by going into Tools > Options > Navigation > Navigation controls). By zooming in, Google Earth often provides high resolution images that can show very detailed objects such as game trails, individual trees and rocks, and water features such as streams and springs.
PLACEMARKS
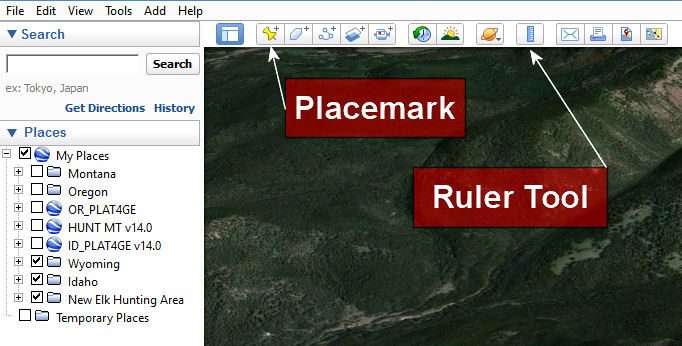
Another key feature that is helpful when scouting with Google Earth is the toolbar located at the top of the page. Within the toolbar, there are a couple of features that come in handy. The first is the ability to add “Placemarks” to your map. This is done by clicking the Placemark icon on the toolbar menu at the top of the screen. A ‘New Placemark’ dialog box appears and a ‘New Placemark’ icon is centered in the viewer inside a flashing yellow square. You are able to add a name and description for the placemark, as well as set the style, color, and icon for each placemark. Additionally, placemarks can be saved to folders which allows you to organize your scouting notes by area, as well as turn on or off groups of placemarks. Plus, if you really want to take your E-scouting to the next level, your saved Placemarks from Google Earth can be imported directly into your OnX HUNT App, giving you immediate access to all of your Google Earth scouting at the tip of your fingers when you are in the field! I’ll provide instructions for how to do this a little later in this Chapter.
RULER
Another helpful feature in the toolbar is the “Ruler”. The Ruler allows you to measure distance, either from point to point (Line) or as a total trip along a path made up of several points (Path). This can be useful when trying to determine the distance from roads or access points to certain features or areas.
IMAGERY DATE
One more very handy feature in Google Earth is the ability to select the imagery date (or the date the image you are looking at was taken). This can be especially helpful in helping determine how much water there might be in a particular area during different months. Imagery isn’t always updated very frequently, but you can select different dates to compare the amount of water in water holes from one month to the next, or to see how much green grass is in a certain area in different seasons. To select imagery dates, simply go up to the “View” tab, and then select “Historical Imagery”. This will place a slider at the top of the page that you can adjust to different available imagery dates. If I am hunting a unit where water is a concern, I try to find a handful of images that were taken during the hunting season from previous years and verify whether water is likely to be available or non-existent.
COMBINING THE POWER OF GOOGLE EARTH AND ONX MAPS
OnX previously offered a “Premium Google Earth Overlay” that allowed you to add OnX features directly onto Google Earth. However, with the latest revisions of the OnX HUNT Membership, you can attain even more powerful features and layers, making the old overlay tool obsolete. Now, the new OnX HUNT Membership allows you to take E-scouting to a whole new level!
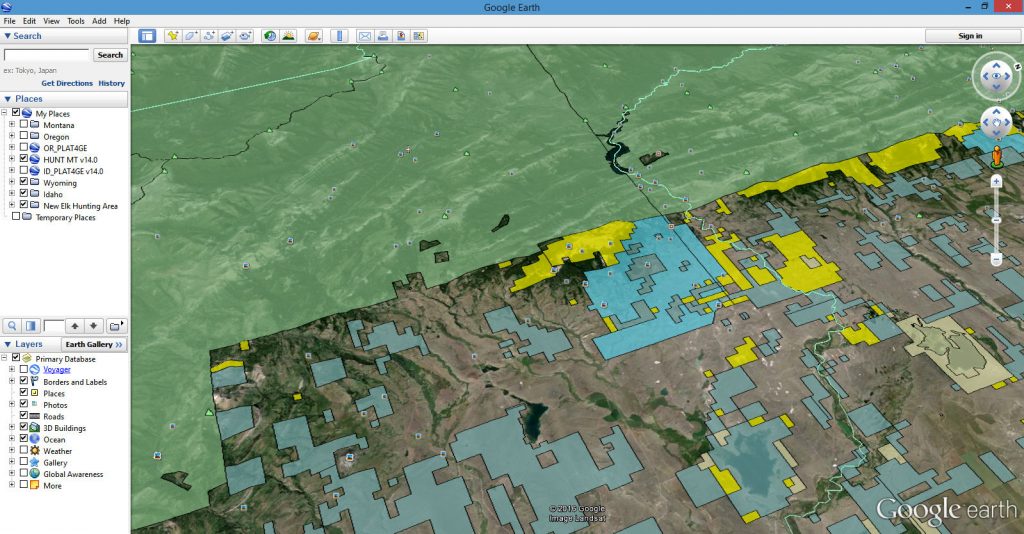
Without a doubt, the 2 tools that I use consistently and continually when it comes to remote scouting for elk are Google Earth and the HUNT App membership from OnX. With OnX, you can literally turn your cell phone into a fully functioning GPS unit…on steroids. You can track your movements in the field, as well as overlay multiple layers directly onto the Topo or Aerial maps (or both at the same time). In addition to the standard mapping features of Roads, Trails, Water Sources, and Topography, the layers found in the OnX app also include features like:
- Private Land Ownership boundaries and information
- Government Land boundaries (National Forest, State, BLM, etc.)
- Roadless Areas
- Timber Cuts
- Historic and Current Wildfire boundaries
- Wilderness Area
- Hunting Units
- Current Weather Reports
- …and much more!
One of the really cool layers available on the OnX app is the Rocky Mountain Elk Foundation (RMEF) layer that shows all of the Elk Conservation projects the RMEF has been a part of. Features within this layer include areas that have been permanently protected by the RMEF, access points for accessing these areas, and current and historic elk ranges.
All of these amazing map features are available to take with you on your mobile device, even if you’ll be hunting in an area with no cell service or WiFi. You can simply download the maps of the area(s) you will be hunting, and access all of this powerful information in the field. And this data is available for every state!
WHAT TO LOOK FOR IN GOOGLE EARTH
Before I jump in and show you exactly how I use Google Earth to locate prime elk hunting locations, it’s important to understand what to look for. Once you have settled on a unit or general area within a state, you need to find areas within that unit that will be most conducive to holding elk. And while locating those areas on Google Earth doesn’t always translate directly to finding elk as soon as you put your boots on the ground, it will give you a major head start.
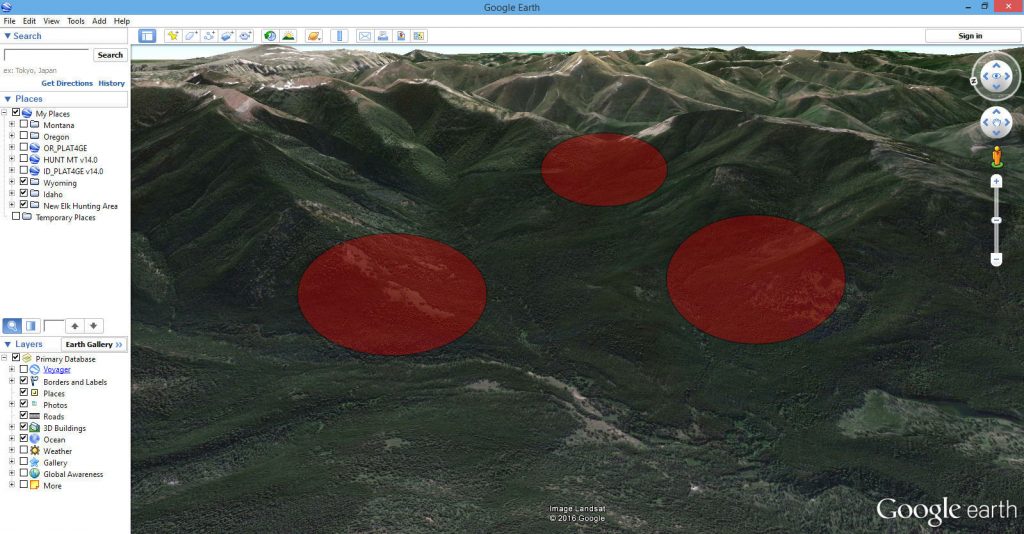
There are three primary features I look for when I scout via Google Earth: Feed Sources, Water Sources, and Bedding Areas. Since there are usually multiple features that can be identified within an area, I further narrow down these features by finding all three of them in close proximity to each other, AND then locate these “clusters” that are found at least one mile off an accessible road. If I can find food, water, and bedding in close proximity to each other at least a mile off the road, the chances of finding elk there are incredibly high.
FOOD SOURCES
Food is a primary, essential need for elk, and they will usually spend time eating at least twice per day. Their primary feeding times are early morning and late evening, but it isn’t uncommon for them to feed throughout the night or at different times during the day. However, it is important to note that elk will typically travel a fair distance from their bedding areas to their feed sources in the late evening, and return from the feeding area to their bedding grounds the next morning. I will go into a lot more detail on the regular habits of elk in the Elk Knowledge Module, but knowing this basic information can help connect the travel patterns of elk on Google Earth.
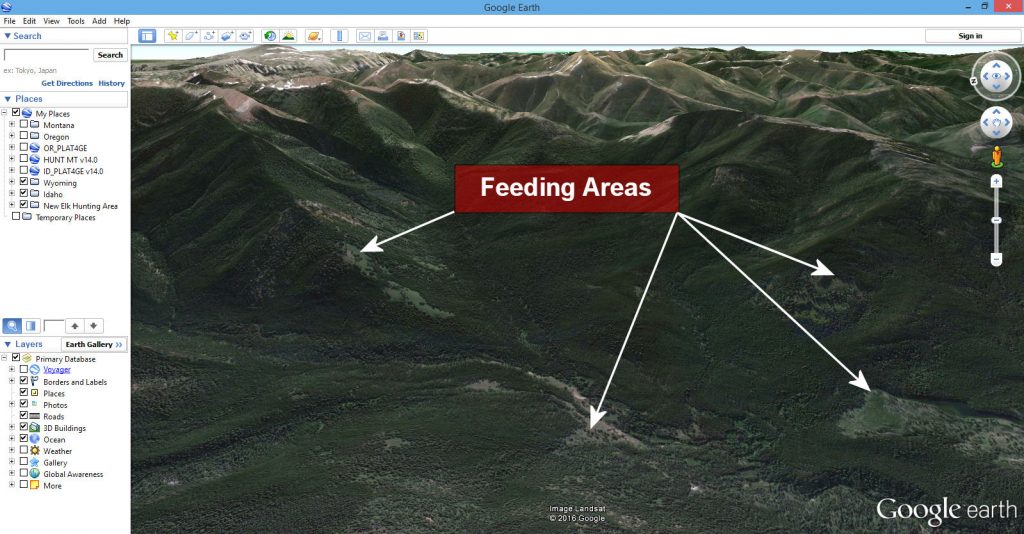
When I look for Food Sources on Google Earth, I am looking for open ridges or open meadows where elk will find nourishing grasses and browse. While there are food sources available in other thicker areas, the nutrients found in low-lying grasses that grow in these open areas are their primary target in the fall. During feeding times, elk are often more readily spotted in these open areas, and my goal is to locate multiple open ridges or meadows on Google Earth.
WATER SOURCES
Water is another necessity for elk, and finding water sources can often be a key component to finding elk. Especially in hot, dry environments, elk will often concentrate their activities around sources of water. Water can be easy to locate on Google Earth, but it can also be misleading. Depending on the time of year the satellite image was taken, or the year it was taken, it may not be an accurate representation of the current water conditions in that area. For instance, if the image is from the spring of a very wet year, you might notice lush, green valleys and benches throughout the image. However, if the next spring and summer were incredibly dry, the water sources you identified on Google Earth might not exist at all.
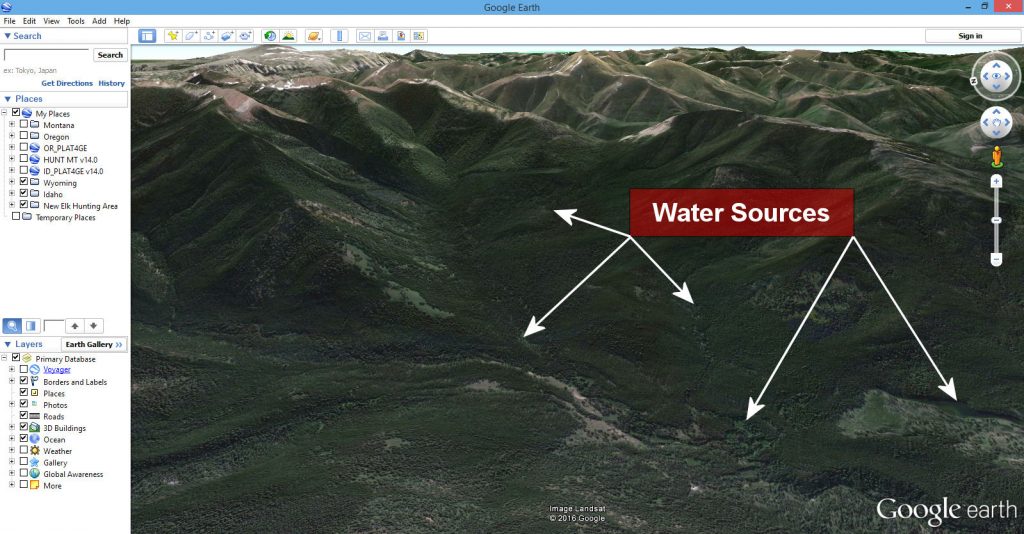
However, it is usually possible to identify regular water sources, even in dry conditions, but it is worth noting that elk locations can and do change based upon their ability to find sustainable water sources.
There are multiple features I look for on Google Earth to identify water. Lush, green creek bottoms can indicate a year-round source of water. Ponds and lakes can be readily identified on Google Earth, and might have a better chance of holding water, even on dry years. In hot, dry climates (Arizona, New Mexico, Utah, Nevada, etc.), you can often identify water “tanks”, which are manmade holding ponds where water is able to accumulate throughout the winter and spring months, and often provide elk with the only available water throughout the summer and fall. It is even possible to identify wallows and springs on Google Earth, which can provide “hidden” pockets of water that elk will often frequent. These areas can be incredibly valuable, especially if you find them close to a bedding area.
BEDDING AREAS
Bedding areas can be a little more difficult to accurately identify. However, my go-to strategy for identifying these bedding areas is simple: find a thick, north-facing slope. The north-facing slopes stay cooler longer throughout the day, which is often what the elk are looking for, especially in the hotter parts of the days during the fall. Additionally, the thicker vegetation that grows on north-facing slopes provides ample cover and security for the elk to rest with minimized threats of danger.
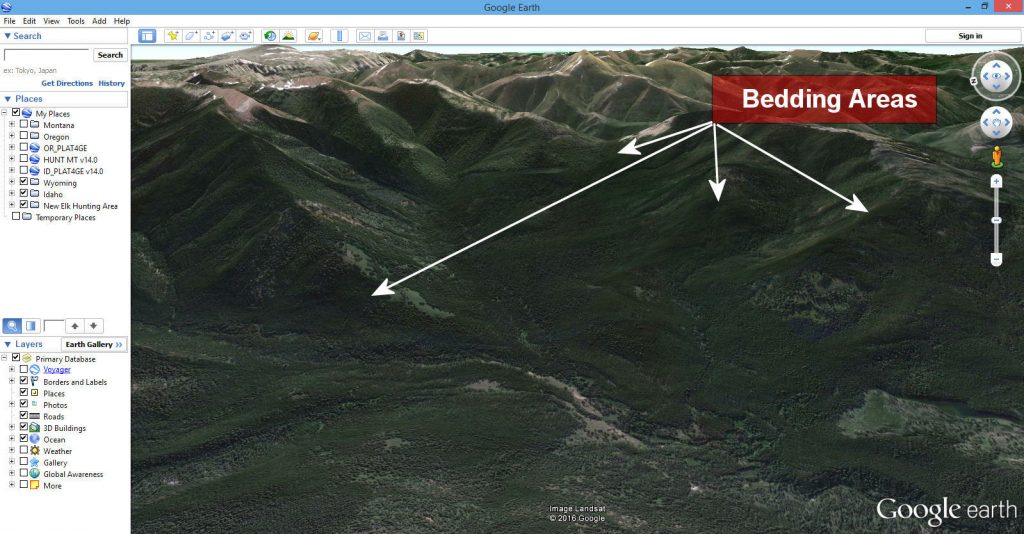
If you can identify a bench or a saddle adjacent to or on a north-facing slope, these areas can be a great location for elk to head to bed down during the middle of the day.
GET AWAY FROM THE ROADS
I’m sure you’ve heard it said that if you get half-a-mile off the roads, you’ll eliminate 90% of the other hunters. There is absolutely some truth to that. So, once I find an area that has food, water, and bedding areas in relatively close proximity to each other, I eliminate the areas that are close to access. It’s not a hard, fast rule, but if I can find those features at least one mile from a road or main point of access, that area will become a primary area to check out. I don’t completely write off the areas that are near the roads, as some of those areas get completely overlooked and can be great spots to check out, but I do put more value on the areas that are going to be a little more difficult to get to.
PRIVATE/PUBLIC BOUNDARIES
In most cases, private land does not get the same amount of hunting pressure as public land. However, many times the best feed, water, or bedding sources are found on public land. Elk may retreat to the private land to escape hunting pressure, but be forced to return to the public land – sometimes daily – to find food, water, or bedding.
Many hunters will avoid hunting near private land, simply because it can be frustrating to hear elk bugling or see elk across a fence-line that is unhuntable. Additionally, the headache of constantly trying to figure out if you’re on public or private in unmarked areas can be a chore all in itself. However, the possibilities of finding good elk numbers entering and leaving private land, combined with possible lower hunting pressure, can provide a great opportunity for a patient elk hunter.
In these situations, it’s vital to know where the public/private land boundaries are, and to be able to keep tabs on them continually throughout the day. Once I identify a handful of potential elk areas, I add Placemarks for them in Google Earth. Then, I can save these Placemarks and import them directly into my OnX App, where I can then turn on layers such as historic wildfires, trails and roads, and Private Land.
I’ll talk a little more about GPS units in the Gear Module (this will include using your OnX App as your GPS), but if you are planning to hunt near private land, a readily accessible “GPS” or land navigation tool such as OnX is vital. With a firm understanding of these tools and how to use them, I can easily identify areas that are going to be more productive without even setting foot in the unit.
Click on the video below to watch how I use Google Earth to effectively scout new areas for elk:
As I've mentioned several times already in this Course, being able to E-scout using Google Earth, and then transfer that data directly to my OnX HUNT App provides an incredible advantage both for remote scouting and actually being in the area. Here is a video clip detailing how to save Placemarks in Google Earth, and then transfer them straight to OnX to have available on your computer AND in the field!
And lastly, if you are still using a standard GPS unit, here is a video clip showing how you can mark locations (Placemarks) on Google Earth, and then transfer those waypoints to a GPS to easily and accurately identify features and landmarks when you're in the field:
With an understanding of how to maximize your scouting using Google Earth, and several areas identified that look promising for finding elk, we're ready to talk about getting out into the field.
Click 'Next Chapter' Below to Continue to Chapter 3: Boots On The Ground


