MODULE 18 - ARCHERY BASICS
CHAPTER 2: SETTING UP YOUR BOW

SETTING UP YOUR BOW
As I mentioned in the previous Chapter, if you purchase your bow through an Archery Pro Shop, they will be able to measure your draw length, draw weight, etc. They will also be able to help you set up your bow so that it is ready to shoot. But, if you aren’t able to go to a Pro Shop, or you want to save some money, or you just want to be able to set up and work on your bow yourself, here is what you need to do. (Be sure to read through the owner’s manual that comes with your bow. It will likely include details on adjusting your draw weight, if you are able to adjust your draw length, finding the true center of your string, etc.)
DRAW WEIGHT
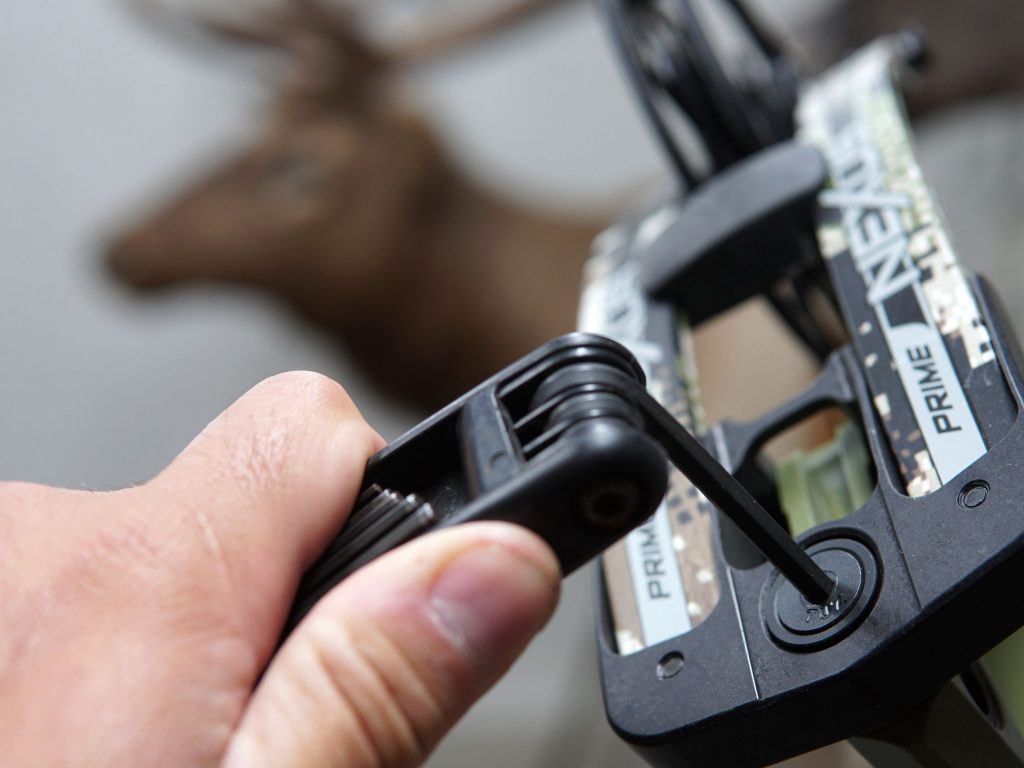
I talked about draw weight in the last Chapter, but now that you have the bow in your hands, you may need to adjust the draw weight. Doing so is easy. Again, reference your owner’s manual before making any adjustments. Most bows are shipping with the limbs “maxed out”, meaning that the bow is set at its greatest draw weight. To decrease the draw weight, use an Allen Wrench (AKA Hex Key) to turn the limb bolt on the top limb counter-clockwise. When you do this, you’ll be able to see the gap between the limb and the riser widen. Every bow is different, but I would suggest turning the limb bolt 2 full turns – that should provide you with a noticeable change in draw weight. Then repeat the exact same sequence on the bottom limb.
Once you have found a comfortable draw weight, you are ready to proceed.

TYING IN A “D-LOOP” AND ATTACHING THE REST
The “D-Loop” is a string loop that is tied onto your bow string, enabling you to attach your release aid and draw your bow back. A D-Loop eliminates the pinching that can occur when a release aid is connected straight to the bow string, which often results in the arrow being ejected off the string. It also protects the bow string from wear caused by a direct release connection. Tying in a D-Loop is rather simple, but its placement on the bow string is critical.
In addition to the location of the D-Loop on the bow string being critical, attaching the rest is equally important. These two items are the only points of contact between the bow and the arrow, and making sure the arrow is close to level is vital to being able to tune your bow and ensure your arrows fly true.
The rest is what holds your arrow level while you are at full draw. I personally shoot a “drop-away” rest. A drop-away rest is an arrow rest that stands up as you draw your bow, and then immediately drops out of the way as soon as your arrow is released. This allows your arrow to be propelled forward without any contact points that could cause the arrow to deflect as it is being shot into motion.
Both of these steps are definitely easier to explain with a video:
INSTALLING A PEEP SIGHT AND ATTACHING THE REST CORD
With the D-Loop and arrow rest installed, your bow is now able to hold the arrow in place for you to shoot. But there is one more important step that needs to be completed, two if you are going to shoot a "drop-away" rest - and they are installing a peep sight and attaching a rest cord (for a drop-away rest).
The peep sight attaches on your bow string, and provides you with a visual alignment to consistently center your sights on a target. Similar to a scope and reticle on a rifle, or a back sight and front sight on an unscoped rifle, the peep sight acts as a rear sight that allows you to maintain a consistent aiming point as you visually place your sight pins on the target.
And if you are shooting a drop-away arrow rest, you'll need to attach a cord from your bow to the arrow rest to mechanically stand your rest up as you draw your bow. Again, these steps are far easier to demonstrate by video:
The rest is what holds your arrow level while you are at full draw, and besides the nocking point on the string, is the only point of contact between the bow and the arrow. Getting your rest attached correctly is an important step in tuning your bow.
And this process is definitely easier to explain with a video:
TUNING YOUR BOW
In my opinion, this is the most important step in the whole set up process. A well-tuned bow with the proper arrows will shoot those arrows in a way that allows energy to transfer most efficiently from the bow to the arrow, and allow the arrows to stabilize quickly as they are released. A bow that is not tuned will not be able to group arrows consistently, and will highlight any issues you might have with your form or shot sequence.
There are several methods for tuning your bow, and none of them are "right" or "wrong". Paper tuning, bare shaft tuning, walk back tuning, etc., are all proven and popular methods of getting your bow and arrow to "communicate" effectively with each other. It's really a matter of preference, and regardless of which method you use, you'll still need to verify the bow's tune in a separate, final step.
I personally use the paper tuning method to dial in the tuning of my bow. Paper-tuning is simple, and doesn't require any special tools or items. All you need is some lightweight paper (packing paper, paint masking paper, newspaper, freezer paper, etc.) and a way to keep the paper pulled tight. I've attached freezer paper from one side of a doorway to the other side using masking tape, and that works great. Or, you can build a simple paper-tuning frame if you take paper-tuning seriously like I do... 🙂
The goal of paper tuning (or any tuning) is to get your arrow to fly true out of your bow. That is, you don't want your arrow to be kicking side to side or up and down as it flies toward the target. So, you can shoot an arrow through the thin paper and see if the arrow leaves a "tear" as it passes through the paper. The tip of the arrow passes through the paper first, leaving a simple "bullet-hole" type of a hole in the paper. The tail-end of the arrow follows, and ideally, will exit through the exact same hole that the tip entered. This will leave one bullet-hole and 3 perfectly vane slits that are perfectly centered on the entry hole. If it doesn't, there is an issue that needs addressed.
Here is a video walking you through the entire process:
SELECTING ARROWS FOR ELK HUNTING
Arrows are the critical components that transfer the energy from your bow to the target. In the case of elk hunting, the target is a 700-800 pound animal, and having the right arrows to do the job is critical. Having an arrow that is the correct stiffness (spine) for the bow you are shooting will eliminate hours of frustration as you attempt to tune your bow. And having an arrow that is heavy enough to penetrate into the vitals of a large animal like an elk will provide you with the quickest, cleanest kill.
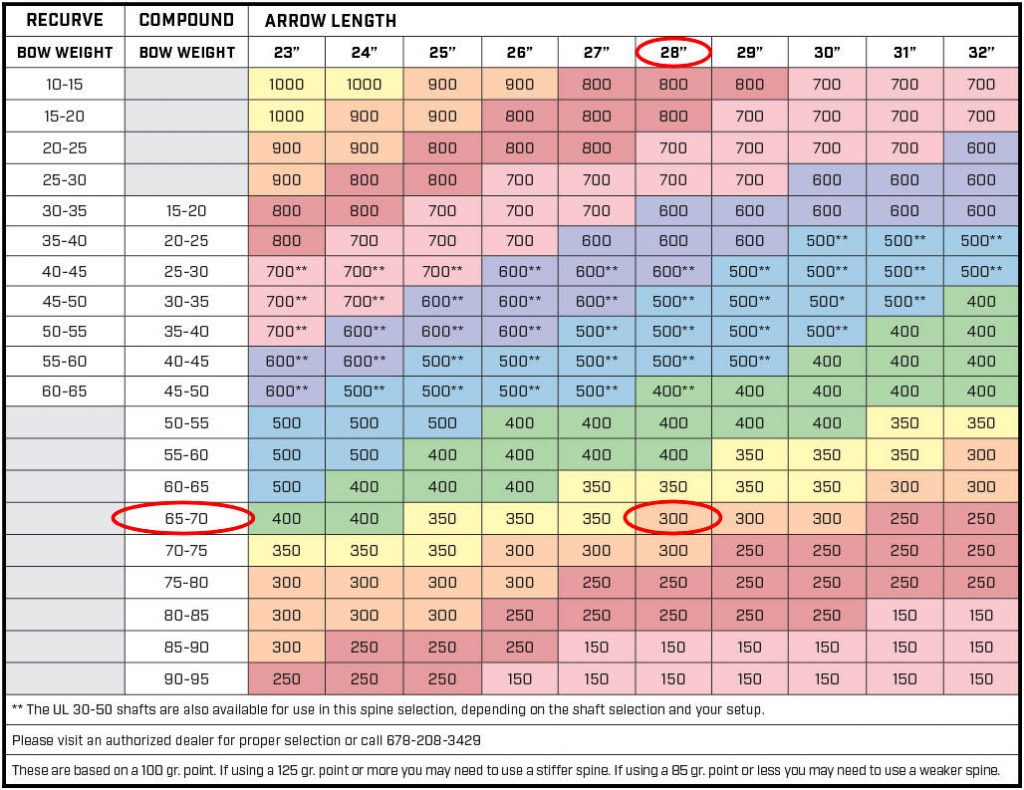
Arrow manufacturers provide an "Arrow Chart" that helps you determine the spine of arrow you should be shooting based on your draw length and draw weight. A correctly spined arrow will tune easily, and ensure that your arrow flexes the right amount to quickly stabilize your arrow's flight. An arrow that is too stiff or too flexible will cause poor arrow flight. Keep that in mind if you are struggling with getting your bow to properly tune.
Before we jump into the video on selecting an arrow for elk hunting, I just want to briefly mention an ongoing "argument" that is common amongst bowhunters - arrow weight vs. arrow speed. A lighter arrow will fly faster than a heavier arrow shot out of the same bow. Faster arrow speed will result in an increase in kinetic energy as well as a tighter pin gap that will allow more margin of error when it comes to shooting.

A heavier arrow will result in a decrease in arrow speed, which will decrease kinetic energy and margin of error, but increase the momentum of the arrow. Here is an example to illustrate this point:
Assume we are shooting a bow set at 70 pounds. Our total arrow weight is 400 grains, which results in an arrow speed of 305 feet per second (fps). This will result in a kinetic energy of 82.54 ft-lbs and a momentum of 0.541 slugs. If we increase the weight of the arrow up to 500 grains, the resulting arrow speed would be 265 fps. This would result in a kinetic energy of 77.89 foot-lbs and a momentum of 0.588 slugs. Taking it one step further, a 600 grain arrow producing a velocity of 220 fps would provide a kinetic energy of 67.38 ft-lbs and a momentum of 0.60.
As you can see, there is a point where momentum plateaus as the mass of the arrow becomes too much for the energy of the bow to propel at an effective speed. The difference in penetration between a 500 grain and a 600 grain arrow shot out of the same bow might be pretty negligible. But a 500 grain arrow gains quite a bit of momentum over a 400 grain arrow shot out of the same bow, with just a slight decrease in kinetic energy.
So, what is most important? Arrow weight or arrow speed? The answer is both. But there is a balance, a happy medium, where you get the most bang-for-the-buck, or for the bull, when it comes to kinetic energy AND momentum. I.e., at what arrow speed/arrow weight do you get the most gain in momentum with the smallest decrease in kinetic energy. Clear as mud? 🙂
Here is a video that will hopefully help:
OK, your bow is set up and you are shooting the best elk arrows your hard-earned money can buy. Let's go shoot your bow!
Click ‘Next Chapter’ Below to Continue to Chapter 3: Sighting In Your Bow


