MODULE 13 - FIELD CARE OF ELK MEAT
CHAPTER 2: PROCESSING AN ELK: IN-THE-FIELD INSTRUCTION

The goal of processing an elk in the field is to remove the hide and get the meat cooling in the shade or near a cool spring as quickly as possible. Even on a really hot day, the meat can still cool properly and you can prevent the loss of any meat due to spoilage. However, the longer the hide stays on the elk – especially if it is in the sun – the more chance you run of the meat spoiling. Additionally, the longer the hide stays on the meat, the more chance you have of ending up with “gamey” tasting meat. Getting the hide off quickly will help the meat cool more rapidly AND make sure your elk meat tastes like it is supposed to.
The first thing I want to impress upon you is the sheer size of a mature bull elk. You will not be able to drag one farther than a few yards, even if you remove the internal organs. You are going to need to be prepared to process the elk right there in the field. The general concept of this process is removing all portions of edible meat from the carcass to allow it to cool and to be able to transport it off the mountain in manageable loads.
The procedure for accomplishing this will depend upon the method you decide to use: Gutless or Gutted. The traditional method of field processing includes removing the internal organs from the abdominal and thoracic cavities – gutting the animal. However, this step is not necessary, and skipping this step can save several minutes of valuable time.
THE GUTLESS METHOD
The main difference between processing an elk with the gutless method versus the traditional method of gutting the animal is the fact that the body cavity doesn’t get opened up. This saves time, and it also saves mess, as there is much less of a chance of exposing the meat to stomach matter when using the gutless method. All portions of edible meat are still easily removed with the internal organs left right where they belong….inside the body cavity!
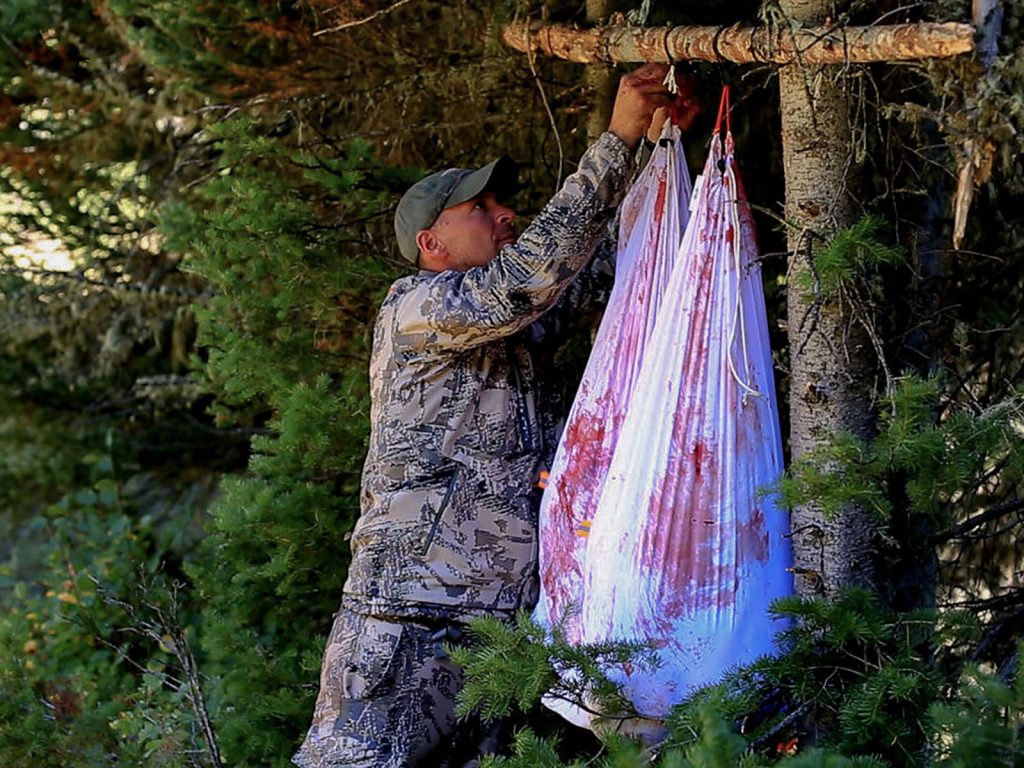
Before I begin to process an animal, I like to find a sturdy stick that can be fashioned into a makeshift meat pole. Using the parachute cord from my Kill Kit, I tightly lash the ends of the stick between two trees. This provides me with a place to hang the quarters as soon as I remove them from the carcass so air can circulate around the meat and cool it faster than if it was laid on the ground. Before we jump into the video to detail the gutless method, here is a basic run down of what you will be doing.
First, remove the hide from one side of the elk. If you are planning to save the cape for taxidermy, you will want to plan the hide removal carefully. Generally speaking, if you are saving the cape for a shoulder mount, you will want to skin the hide off the carcass from the spine down. That is, your incision goes along the spine, up to the base of the skull, and the hide gets skinned (peeled) down toward the legs.
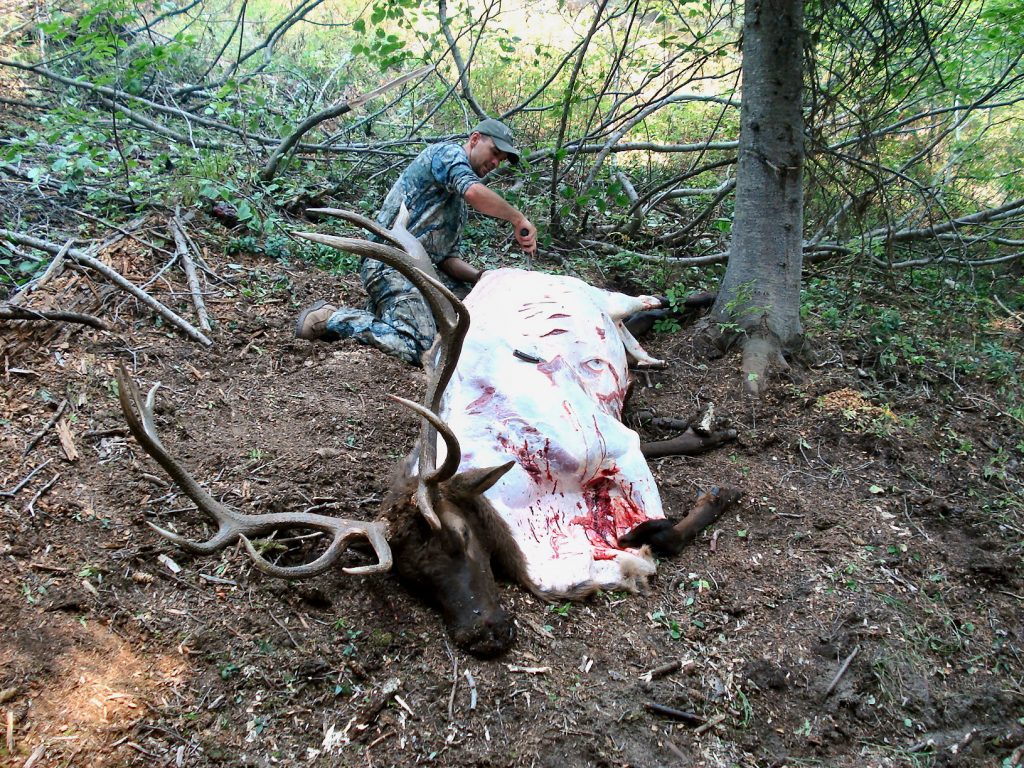
If I’m not concerned with saving the cape, I prefer to make the incision across the belly and skin the hide up from the legs toward the spine. I feel this method helps keep the meat a little cleaner, especially when it comes time to roll the elk over onto the other side.
For details on how to save the cape for taxidermy, be sure to check out the section on ‘Preserving the Cape for Taxidermy’ below, and watch the video showing how to properly do this.
Once the hide is off the entire side of the elk, it is simply a matter of removing all the meat. I begin with the quarters. The hind quarter is attached by a ball joint that connects the leg bone to the hip bone. Other than the ball joint, all that connects the quarter to the carcass is meat. By cutting the meat along the hip bone down to the ball joint, and then cutting through the connective muscle/meat that attaches the hind quarter to the body, you can easily remove the quarter and hang it on a meat pole or place it in a game bag. The front shoulder is even easier to remove as it is not attached by anything other than muscle and tissue. You simply “filet” the front shoulder off the rib cage, and it can then be hung from a meat pole or placed in a game bag.
Here is a note to consider regarding the quarters: I prefer to cut off the lower portion of the legs either while the quarters are still attached to the carcass or once the quarters are hanging on the meat pole. This removes weight and makes the quarter easier to handle. Simply find the joint where the lower section of the leg attached to the upper section, and carefully cut around the joint. Applying some pressure on the lower portion of the leg, you should be able to “snap” it at the joint and cut the lower section free from the upper.
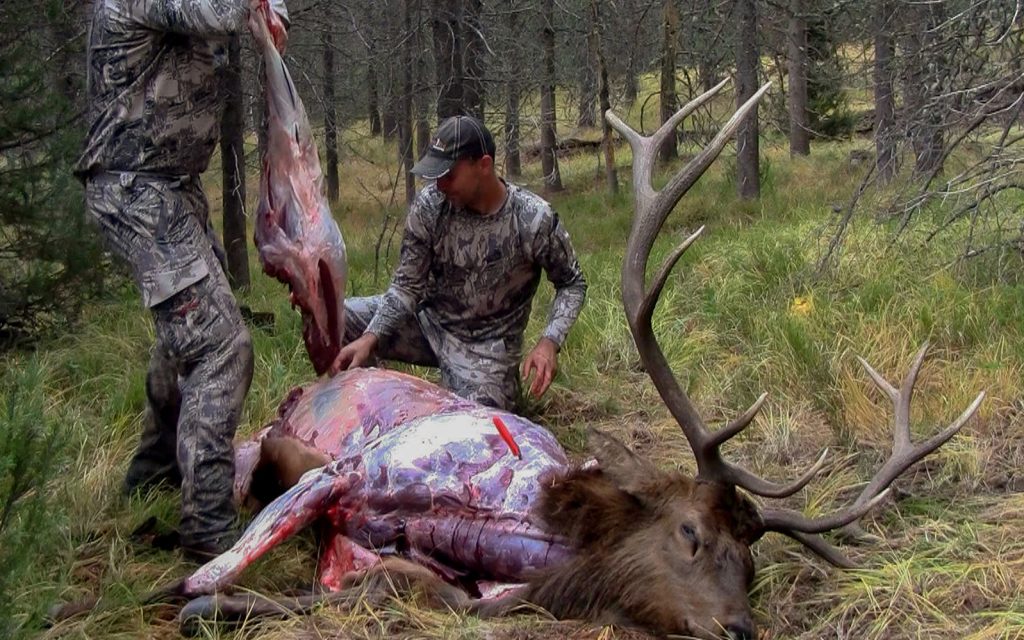
With the hind and front quarters removed, I move to the backstrap. The backstrap is the long muscle that runs alongside the spine on both sides (think rib, t-bone, sirloin). It is one of the best cuts from an elk, so you don’t want to make hasty cuts! The backstrap is connected on one side to the spinous process, and on another side by the top portion of the ribs (where they connect to the vertebrae). A straight cut along the spinous process will free one side of the backstrap, and another cut along the top of the rib cage will free up another side. I like to make a finger hole in one end of the backstrap for better handling, then simply filet the entire backstrap off the ribcage/spine. It will come off in one big strip of mouth-watering deliciousness! The backstrap is a different cut than the tenderloin, which we will get to in just a minute.
After the backstrap, I begin removing all the neck meat. Cutting the neck meat off in muscle groups can make the work easier, and it also allows the meat to cool faster than trying to bring all the meat off the neck in one big mass. With the neck meat off, I then remove the brisket meat – the meat under the front leg and at the bottom of the neck (sternum area). Then, I remove the scrap meat covering the ribs and any other meat that might be left on the carcass. The last removal I make before beginning on the other side is the tenderloin.
The tenderloin is a small, tender muscle located inside the abdominal cavity, right along the spine, just in front of the hip bone on both sides of the elk. With all the meat removed from this side of the elk, the tenderloin is really easy to remove. Simply make an incision along the backbone from the hip bone up to the last rib (flank area). You can reach in with your hand and feel the tenderloin laying right there against the spine. Cut each end of the tenderloin free, and then start working it free. The meat is incredibly tender, and will tear free without too much effort. The tenderness of this cut of meat is not lost once it reaches the grill!
With all the meat removed from this side of the elk, pull the hide back over to cover the carcass. This will help keep dirt off the meat as you roll the elk over to begin removing the meat from the other side. Then, roll the elk over and repeat the process on the opposite side.
I realize that simply writing out this procedure leaves many unanswered questions, so I’ve put together a very detailed, NEW video that shows each step of the gutless method. This NEW Gutless Method video shows how to use the Gutless Method if you are also wanting to preserve the cape for taxidermy (shoulder mount).
Click the video below for a step by step demonstration of the Gutless Method:
If you are interested in checking out an alternate way of using the Gutless Method (if you don't need to preserve the cape for taxidermy), you can watch the Original Elk101.com Gutless Method video below:
Getting the hide off the elk and then removing the quarters is vital to allowing the meat to cool quickly. Even with these steps, there is still a possibility that some of the meat might not cool fast enough. The bones inside the quarters – especially the hind quarters – that are surrounded by large masses of muscle can retain body heat. With hotter outside temperatures, these areas are at the highest risk of “bone sour”, or spoiling from the inside. There are two things you can do to reduce this risk.
First, a single, deep incision through the larger muscle masses down to the bone will allow heat to escape rapidly (primarily the ham area on the hind quarter). Secondly, you can bone the quarters out – i.e., remove all the meat from the leg bones. This will get the meat away from the bone and expose the inside portions of the muscle groups to the outside air, effectively cooling the meat much more rapidly.
Even if heat isn’t an issue, there may be times when you will either want to leave the bone inside the quarter, or bone the quarters out. I like to keep the bones in the quarters if the pack isn’t terribly long or difficult. The bones provide rigidity to the quarters, and sometimes make the load a little easier to secure to the pack.
On the flip side, removing the bones can save several pounds from an already heavy pack. The average weight of a leg bone (hind or front) on a bull elk is over 8 pounds each, which can translate to a total savings of 35 pounds on your back. This much weight reduction on a heavy, long pack out is not insignificant!
If you are packing quarters with the bone in, you can put the meat into game bags as soon as you pull it off the carcass and then hang the game bags on the meat pole. This will keep it as clean as possible, and it is then ready to load onto your pack. Or, if you plan to remove the leg bones from the quarters before you place the meat in game bags, here is what I do.
BONING OUT THE QUARTERS
If I am boning the quarters out, I typically take the quarter to the meat pole and hang it without placing it in a game bag. Having a partner there who can immediately start removing the meat off the bones is ideal. If you are alone and the meat is going to hang for a while before you start boning it out – especially if flies and bees are a concern - you may want to pull the game bags over the quarter to protect the meat while you finish removing the other quarters from the carcass. Always remove all the meat from the carcass before you start boning out each quarter if you are alone.
The process of boning out an elk quarter is pretty straight forward. You want to remove all the meat from the leg bone and get it into a game bag. This can be accomplished two different ways. The first method is to take the meat off the quarter, one individual muscle group at a time. This produces smaller, individual “chunks” of meat, which allows the meat to cool faster. The second way to bone a quarter out is to simply filet the meat off the bone so you end up with one large mass of meat (minus the leg bone). This method is probably slightly faster, but the first method allows for faster and more efficient cooling of the meat.
In the video below, I demonstrate how to bone out an elk quarter using each method:
IMPORTANT REMINDER: As I mentioned in the previous Chapter, many states require that Evidence or Proof of Sex remain attached to the carcass or the hind quarter while packing and transporting elk meat. Here is a short video showing how to leave Evidence of Sex attached:
PRESERVING THE CAPE FOR TAXIDERMY
If you are saving the cape for taxidermy, be sure you have planned ahead and are prepared before you start field dressing the elk. Be very careful as you are skinning the elk to make sure you keep enough of the cape to provide the taxidermist with plenty of hide to work with. REMEMBER, TOO MUCH HIDE IS BETTER THAN NOT ENOUGH! The details below (and "Gutless Method + Caping For Taxidermy" video above) will give you a basic idea of where to make the cuts to ensure you keep what your taxidermist will need.
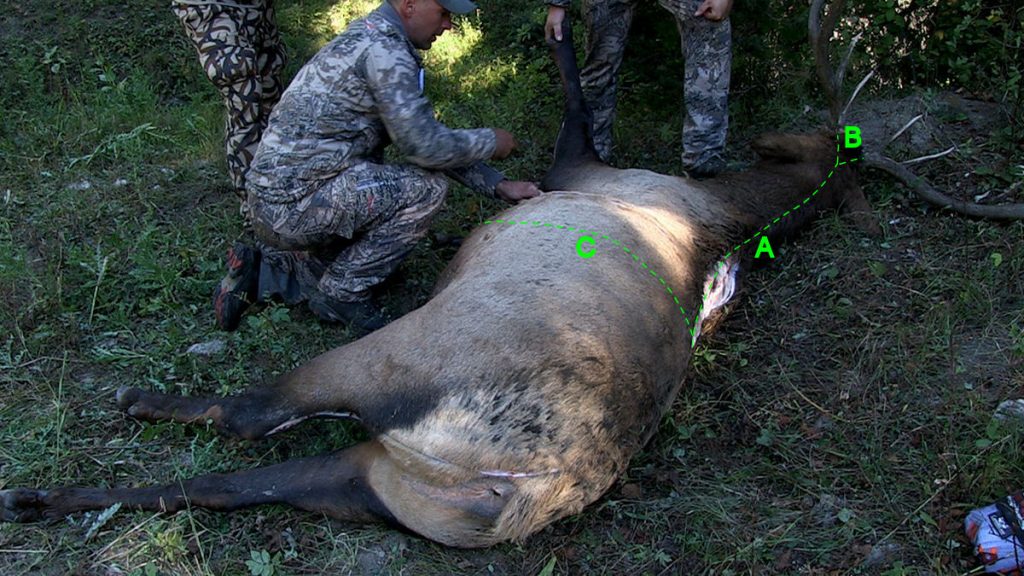
To remove the hide and save the cape for taxidermy, make the following incisions:
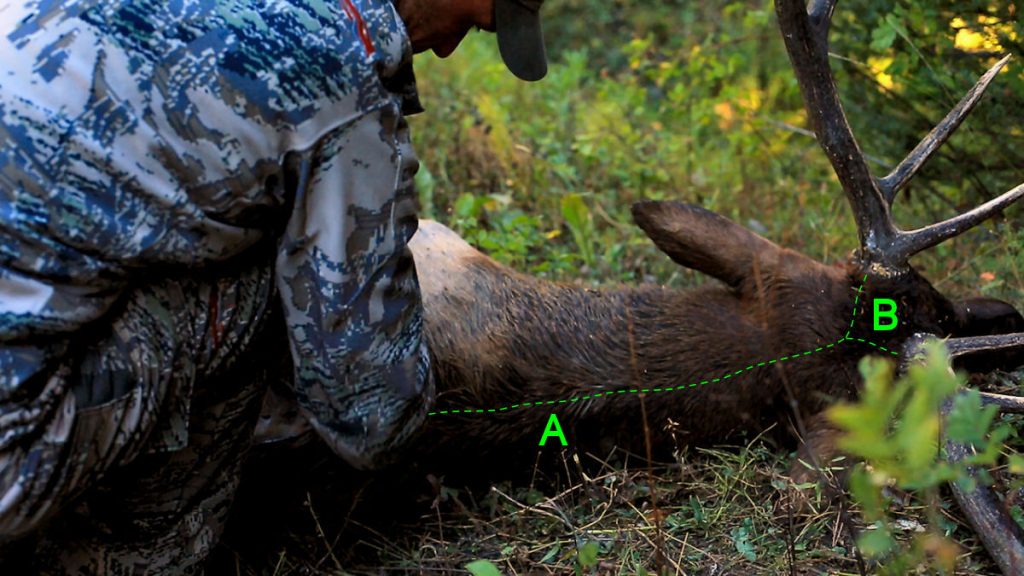
A. Make your initial incision (Incision A) along the backbone of the elk. This cut will run along the backbone from the middle of the body all the way up the neck to just below the ears.
B. From there, you will make a “Y” cut (Incision B) that goes to the base of each antler.
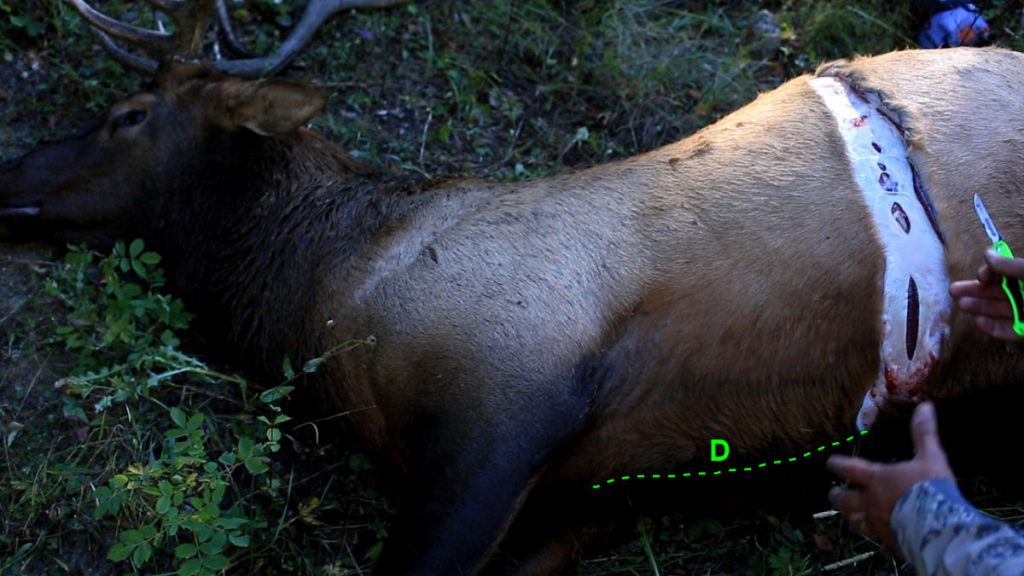
C. Then, make an incision (Incision C) starting at the backbone (at the middle of the body) and going straight down the ribcage to the belly. This is where you want to make sure you have left plenty of hide. I always error on leaving too much, and making this incision farther back as opposed to making it too close to the shoulder.
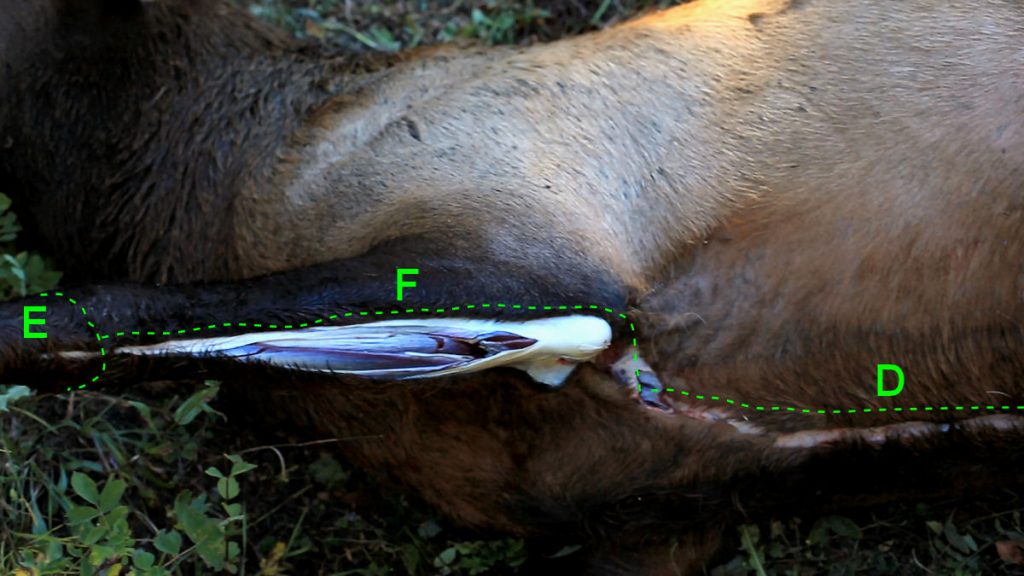
D. From the bottom of the belly, cut toward the front of the elk (Incision D) until you get to the front leg.
E. Next, cut around each front leg (Incision E) just above the knees to remove the lower portion of the legs.
F. Then, cut the hide along the back side of the leg (Incision F) up to the “armpit”. From there, cut from the “armpit” to the bottom of the elk and connect with your Incision D.
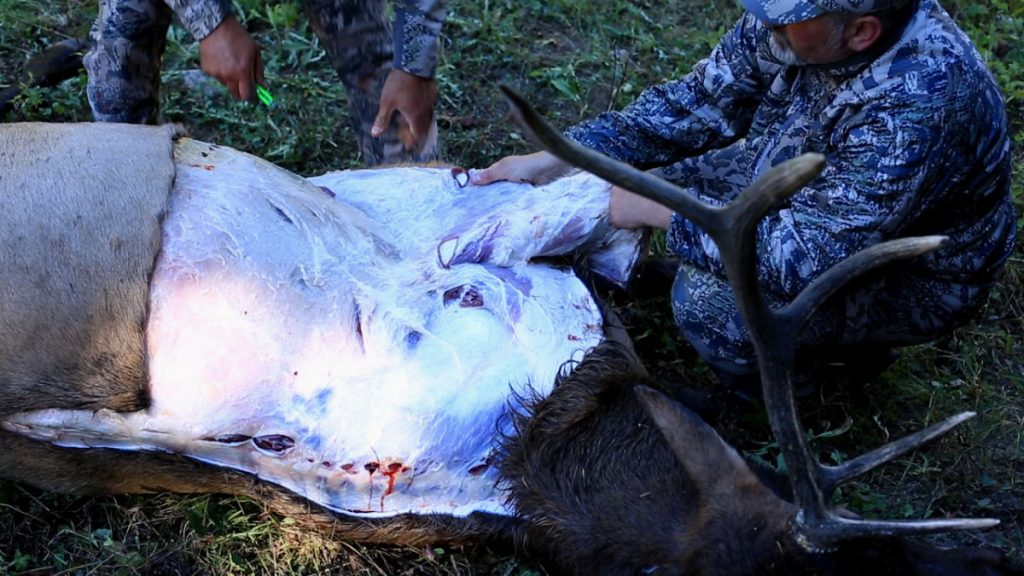
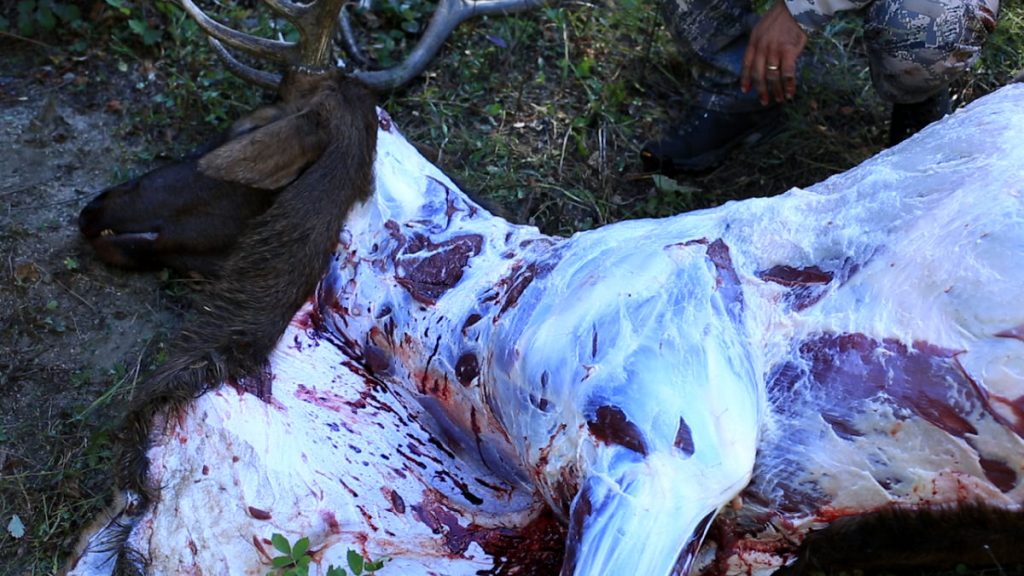
Again, refer to the video above on the "Gutless Method + Caping for Taxidermy" to see how to preserve the cape using the Gutless Method.
If you are able to get the hide to a taxidermist quickly, you can leave the cape attached to the skull and just remove the head from the carcass for the pack out (the skull will still be inside the cape). To do this, be sure you have removed the hide/cape from the carcass up to the base of the antlers. Then, cut through the neck/vertebrae just behind the skull. With the skull detached from the carcass, remove any large pieces of meat that are attached to the cape and scrape or wash any blood off the cape as those will be the first areas to begin spoiling.
It is important to let the cape and skull cool as much as possible. To do this, place the skull and cape in the shade (in a cool draw if possible) and tip the head forward onto the antler tips. Then, spread the cape behind the skull with the flesh side up. This will allow the head and cape to cool quickly and prevent spoilage that can cause the hair to fall out of the cape. Once the cape and skull have cooled, roll the cape up so the hair is on the outside, or fold the cape over so the flesh is contacting (flesh to flesh), and then place it in a game bag. I like to carry an extra game bag solely for transporting the rolled-up cape/skull.
If you aren’t able to get the hide to the taxidermist within 24-48 hours, you will need to remove the remaining cape from the skull. It is important to make sure you don’t remove parts of the cape that will be needed for taxidermy (i.e., the areas around the eyes, nose, and lips).
Start at the “Y” incision you made at the base of the antlers. Carefully skin the hide away from the skull around the base of the antlers. This is precision skinning, and will take some time.
Continue skinning the hide off the skull and be careful when you get to the ears. Cut through the ear canal cartilage as close to the skull as possible. At this point, the cape should be clear of the antlers and you will continue “rolling” the hide down off the skull. Be very careful around the eye sockets, as this is one of the areas that gets damaged the most.
To ensure you don’t damage the cape, insert your index finger into the back edge of the eye socket (from outside the hide) and pull the skin around the eye socket tight. Then, cut the skin around the eye socket keeping your knife behind your finger. This will keep you from cutting the eye lids. When you reach the front edge of the eye socket, keep your knife blade right against the skull and continue peeling the skin loose around the tear duct. Then, continue skinning down until you reach the nose.
Cut down through the nose cartilage to remove the nose, and then carefully start cutting the gums that attach the lips to the skull. Keep your knife tight along the skull again so you don’t leave the gums/lips attached to the skull. At this point, the entire cape should be free from the skull and antlers.
Be sure to ask your taxidermist ahead of time how they want you to prepare the cape, but if it’s going to be a couple of days before you get the hide to a freezer or the taxidermist, you’ll need to apply some salt to the hide to pull the moisture out and keep it from spoiling. Another product that works great for removing moisture from the hide is T.T.C (Taxidermy Trophy Care), which is a cape preservative that is more effective than salt. Whatever you use, you’ll want to lightly coat the flesh side of the cape and rub it in to make sure you get complete coverage. Then, fold the cape with the flesh side in (flesh to flesh) and place the cape in a game bag to carry out.
REMOVING THE ANTLERS AND IVORIES
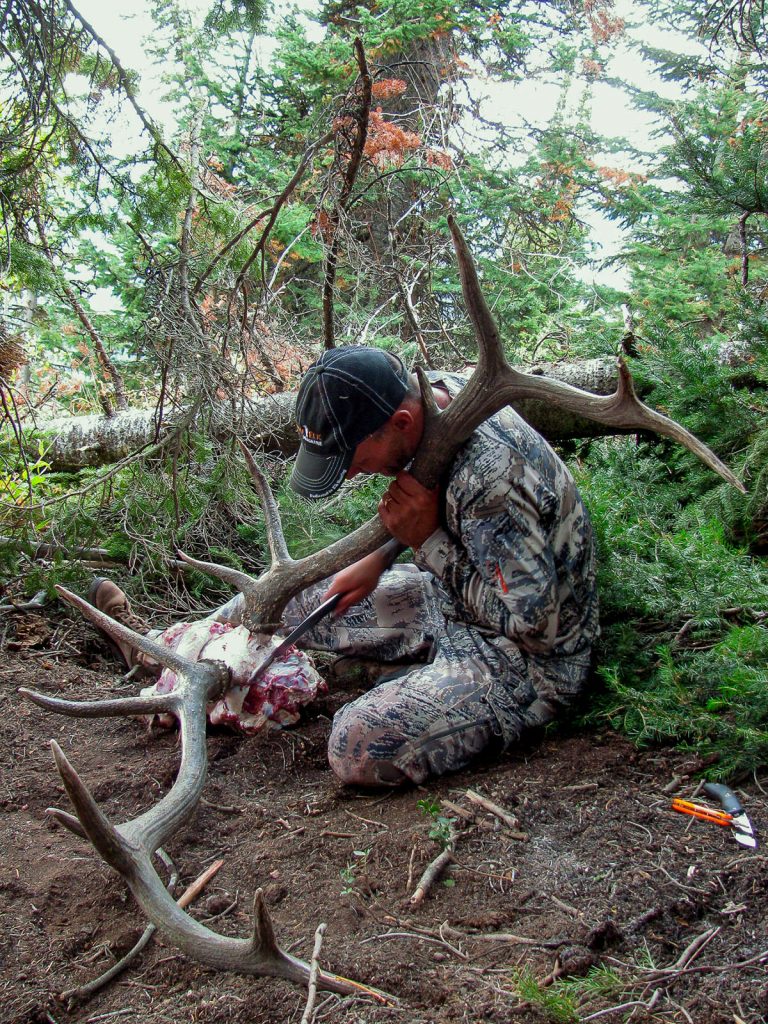
If you are not saving the cape, but want to save the antlers and the ivories, you have a couple options. First, you can remove the hide from the skull like I explained previously, and bring the entire skull out for a European mount. The ivories can be left in the skull until you get home, or they can be removed in the field. The second option would be to simply cut the antlers off the skull. You will definitely want to remove the ivory teeth from the skull before heading out if you choose this option.
If you are using the first option, begin by skinning all the hide off the skull. Since you aren’t saving the cape for taxidermy, you can make an incision from the back of the skull straight across the top of the skull down to the nose, rather than “rolling” it off like if you are keeping the cape. Then, simply skin the hide off the skull.
With the skin removed from the skull, you can find the joint where the last vertebrae connects the spine to the skull. Use your knife to cut through the meat at this point and expose the joint. With some twisting and turning, you will be able to cut through the joint and remove the head from the carcass.
With the head removed, you are ready to attach the skull/antlers onto your pack. If you want to remove a few extra pounds, you can also remove the lower jaw. Removing the lower jaw is fairly difficult, but you will want to use your knife to cut away any connective tissue and muscle that is keeping the lower jaw attached to the skull.
If you aren’t interested in keeping the skull for a European mount, and you simply want to remove the antlers, you will save both time and weight for the pack out. However, you will need a bone saw or a hatchet. Without some way to remove the antlers from the skull, you will be forced to bring the entire skull out.
With a bone saw or hatchet, make a cut from behind the antlers angling slightly forward. Then, make a cut from just above the eyes (in front of the antlers), and angle back to connect with your first cut. This will remove the “skull cap”, and allow you to remove the antlers from the skull.
Don’t forget to remove the ivory teeth from the skull if you aren’t packing it out with you!
Here is a quick video demonstrating where to make the cuts to remove the antlers from the skull:
When you get home, you can preserve the memory of your hunt and create a tasteful display of your animal, even if taxidermy isn’t the route you want to go. This can be done by doing a “European” or skull only mount of your antlers.
If you decide to go this route, here is an instructional video that will walk you through preparing your skull for a European Mount.
SUMMARY
Processing an elk in the field is hard work. Having the right tools – and the right knowledge of how to get the job done – will make it slightly less hard.
Additionally, there is no meat in the world that is as delicious and organic as a wild elk. Being educated on how to maximize your efficiency in processing that elk in the field undoubtedly increases the quality of the meat that ends up in your freezer. With the elk now fully broken down into manageable portions, you are ready to start the real work…packing!
Click ‘Next Module’ Below to Continue to Module 14: Packing Your Elk


